Kaleido by Silkie B.

Knitting Designs By Silka Burgoyne

Kaleido by Silkie B – Accessory 2011 eBook April 19, 2012

As I am working on the new Accessory Collection for year 2012. I decided to combine 4 of my accessory patterns that I designed last year and created an eBook. This publication is currently available for sales in Ravelry.com in a discounted price. You can still however buy each individual pattern separately.

Here are the detail of the patterns that included in the collection:

Maneisha

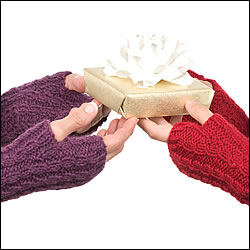
Maneisha is the very first design I have created for my Accessory Collection 2011. Maneisha is a fingerless mittens design that combined Eyelet Cable Rib and a texture stitch. I wanted to create a design that is fun for experienced knitters and also fun for beginner who would like to experience working on cable and lace and using magic loop method.

Hannie
A little cable beanie design for both kids and adult. Please don’t be fooled by the cover, the pattern for this beanie has adult sizing! Hannie features allover double texture cable motif and it is perfect for both gender. Knit in heavy worsted weight or bulky yarn and it will definitely keep you nice and cozy in the winter. Hannie knits up quickly and will be a perfect gift for the holiday.
Serena

Serena is a cable cowl that is a perfect accessory for the cold weather. It is also a perfect gift for someone you love. Work in worsted-weight yarn and features interweave cable panel pair with 6-sts cable rib that is perfect for both gender and kids. Serena is easily customize to fit each individual needs.

Reese

Reese is a cable scarf and Beanie set is for all ages and gender. It’s a prefect gift for anyone or yourself.

Reese Scarf measures 60″ x 8.5” and it can be widen or length depending on personal preference. It can also modified to turn into a cowl. Attached I-cord has applied to all sides of the scarf to prevent the side to roll inward. The attached I-cord also create a nice smooth side edging.

Kaleido by Silkie B – Accessory 2011 is on sales now on Ravelry.com for $10 USD. If you are interested in this collection, simple click on the ‘Buy Now’ Button below and it will bring you to my Ravelry. If you would like to purchase any of the patterns within this collection, simple click on the design image that you like, it will bring you to the individual pattern detail page and you can purchase through there.

Happy Knitting!!


Sneak Peak – Kaleido Accessory 2011 November 6, 2011

Like I mentioned in my previous post that I am putting out a collection of Winter Accessories.. and thanks so much to my friend Karen K for a last minute photo session this afternoon and thanks for all the models for the my projects, Eric, Tara, Kimi and myself! Here is sneak peak of the collection. Please note that all the designs are suitable for both gender.

Introduction Serena – A cowl features interweave cable panel with cable rib. It measures 63″ in circumference and 8″ height.

Introduction Hannie – A cable Beanie for the kiddos. Thanks Tara K and Kimi for modeling the Beanie.

Introduction Reese – A scarf and Beanie set. It feature cable Rib with a little variation. I am working on the Mittens for the set. The mittens will be available in the coming week and with 2 different version, one tradition mittens style and one with convertible style. Thanks Eric D for modeling them, it was so last minutes and Eric was in such great sport to help.

I am currently working on the written instruction. All these pattern will be available individually or as a collection. They will be made available via Ravelry. I will keep everyone posted on when it will be available. So stay tune!


Back to Basic – convertable Mittens August 28, 2011

Convertable MittensIf you are a knitter and loves to knit kidswear, then you will certainly like Petite Purls. Petite Purls is similar to Knitty but specialize in Kids knitwear. Petite Purls publishes 4 issues a year and fills the issue with trendy and beautiful knitting patterns for kids. Petite Purls also publishes a list of patterns what they call ‘Back to Basics’; the idea of ‘Back to Basics’ is to provide pattern that not only will be great beginner patterns to work from, but also great patterns for those of knitter who want to explore their creative side: a good starting point for colorwork, a decorative stitch pattern, or a border motif. The possibilities are endless.

Stripy versionThis month, Petite Purls, has added my convertable mittens pattern to their ‘Back to Basics’ issue. The design for this basic convertable flap mittens pattern creates a blank canvas for knitters to create their own version of flap mittens. This basic pattern can be easily adopted to create a pair of striped or Fair Isle mittens. Check out my version of the covertable mittens! For those of you would love to have the pattern for the stripe version, check out the upcoming issue of Interweave Gifts which is available very soon!

The pattern for the Basic convertable Mittens is free and available HERE!

Stripe Version


Maneisha is live! July 5, 2011

This slideshow requires JavaScript.


After all the delay, the pattern for my first design for my Accessory Collection, 2011, Maneisha, has completed and live at Ravelry.com. For the Accessory Collection, 2011, I wanted to create a collection that is functional and with different skill levels for all knitters. Maneisha is a fingerless mittens design that combined Eyelet Cable Rib and a texture stitch… I wanted to create a design that is fun for experienced knitters and also fun for beginner who would like to experience basic cable and lace knitting and also using magic loop method.

Here is the basic information about Maneisha:

SIZE
One Size fit most

FINISHED MEASUREMENTS
Arm Circumference: 7.5 inches without stretch
Length: Can be varies depending on each individual preference

MATERIALS
Yarn: tern by Quince & Co. (75% American Wool, 25% Silk; 221 yd [202m]/50 g)
Back Bay (148); 1 skein

NOTE: Substitute tern with any fine yarn that maintains the same gauge.

RECOMMENDED NEEDLE SIZES
Ribbing and Hand – Size 1 (2.25 mm): 29 circular (cir) needle or longer for magic loop method. Adjust needle sizes to obtain the correct gauge.
Wrist – Size 2 (2.75 mm): 29 circular (cir) or longer for magic loop method. Adjust needle sizes to obtain the correct gauge.

NOTE: If you prefer using dpn, please substitute the same size as the circular needle

NOTIONS
2 Waste yarn or a spare pair of circular needle, 2 stitch markers, Tapestry needle

GAUGE
32 sts and 35 rows = 4 inches in Eyelet Cable Rib st with Size 2(2.75 mm) needle
26 sts and 40 rows = 4 inches in Dot Stitch with Size 1 (2.25 mm) needle
34 sts and 40 rows = 4 inches in Twisted Ribbing Stitch with Size 1 (2.25 mm) needle

The pattern include detailed instruction, chart and instruction on magic loop method.

A special thanks to my friend, Suzanne, at Sphotoart for taking pictures for my design.

As always, if you have any question, please feel free to contact me.

If you would like to purchase this pattern, simple clicks here:

Happy Knitting!!!


Introducing Bella Set December 24, 2010

This slideshow requires JavaScript.

Bella Set is my very first online publication. It is features in the winter issue of Petite Purls: http://petitepurls.com/winter10/winter2010_p_bella.html

Bella is a set of headwrap and guantlets… it is a set that I designed for my daughter Kimimae. Kimi always wanted to have her pictures online.. so now she has gotten her chance for being my model and thanks my friend Karen K. for taking the pictures…

As always, if anyone has issue with the pattern, feel free to contact me.

I wish everyone happy knitting 🙂


Covergirl!!! September 21, 2010

Of course I am not talking about myself as a cover girl. I am no model material of course… don’t have the look and the body and the move to be one. However, I am very excited to see my twisted beanie and mitten set made it to the cover of November 2010 Issue of Creative Knitting! It was such an honor and I cannot expressed how excited I am!

I first got the news about the cover from Barb, the editor of CK when I was in the midst of getting ready for my camping trip. Barb would like me to keep it as a secret until the issue goes live… so I kept my excitement and went on to spend time a few days with my family in Pentwater, MI. The weather was perfect, the beach was beautiful and spending quality time with family did help me not to think and talk about the magazine cover.

And now, the magazine has gone live. I have not problem sharing my excitement with all of you. So go ahead.. and grab a copy!


Victoria and Bonnie is available!! September 7, 2010

Just want to announce that the patterns for Victoria Gloves, Victoria Socks and Bonnie Mitts are available through my site, Ravelry and my etsy store. Simple go to my pattern link and click on the image for more information. I have also put Victoria Gloves and Socks as a set in a discounted price.

As always, if you have any questions regarding the patterns. Please feel free to contact me!

Happy Knitting!


Magic, the Magical Loop January 3, 2009

Filed under: Technique — silkaburgoyne @ 11:03 pm
Tags: , , , , ,

I knitted my very first pair of socks using 5 dpn, the traditional way what a lot of knitters think. Although the socks came out great for a first timer in socks knitting, I wanted to have an easier way to knit socks. Then a couple years ago, I heard about people talking about the Magical Loop method, I also heard people saying about knitting a pair of socks using 2 circular needles. I wasn’t sure how I felt about the magical loop method when I first heard it… but since handknit socks are in everyone wish list for the holiday, I was willing to try different method to knit socks faster. I finally did some research on the magical loop method and try it. And I totally love it. Since mastering the skill, I have knitted more than 10 pairs of socks and I also using magical loop method method for fingerless mitten, finger mitten and hat. Since most of the socks patterns are written in 5 dpn, so I have figured out a basic sock pattern to use magic loop. I have so much fun knitting socks and mitten, I have started designing pattern for socks and gloves for using the method.

To see whether the magical loop is a better method than 5 dpn, I have tested in a seasoned knitter, my mother. She have been knitting for more than 40 years. She knitted everything using dpn and she believes it’s easier to use dpn when I taught her the magical loop method. she tried the first pair of finger mitten using magic loop, she was not sure when she started; however, when the mitten was finished, she absolutely loves the magic loop method. I figured if I can change my mother’s mind, then the magic loop method is indeed a good alternative to dpn for socks, mitten etc…


Here is a design that was published in the November issue of Creative Knitting magazine. The fingerless mitten is knitted using magic loop method.

In case anyone who is not familiar with the magic loop method, a magic loop is actually a long circular needle, a circular needle with at least 32″ long, preferable with circular needle that has very flexible wire, such as needle from KnitPicks or Audi Turbo needle.

Following is the instruction of the magic loop method:

1. Cast on an even number of stitches (sts) and slide sts to middle of cable.

2. Divide sts in half and pull cable loop out between two groups of sts.

3. Slide sts down to their respective needle tops. You will have half of your sts on each needle tip. Hold needle tops parallel and pointing to right, working yarn will hang from back group of sts (I’ll call the sts as group 1, and the front group of sts as group 2).

4. Pull the needle tip out (will be group 1 sts) until you have enough cable to allow you to work sts (group 2) on front needle .

5. Work all sts on front needle, being careful not to twist.

6. Turn work and make sure the working yarn is hanging from back and needle tip point to the right. Slide the front group of stitiches to the needle tip then repeat step 4 as many times as needed.

So here is the simple way of magic loop method. The first few rows might look a little different because there might seem to have a gap in between the join of the round. However, as you continue working, the gap will automatically closed up. It might seem awkward to knit a pair of socks using the method at first; however, once you get familiar with it, it is a piece of cake.